A lighting takeoff turns the lighting plans and the fixture schedule into quantities you can price: light fixtures by type, emergency fixtures, exit signs, lighting controls, and the branch circuits and home runs that connect them. This guide walks through it in the order that keeps the count clean, using one real lighting plan sheet from a public bid set (an elementary school) as the example.
That one sheet, E-101-B, drawn at 1/8" = 1'-0", holds 450 light fixtures, 31 exit signs and 69 lighting controls in our run of it. That is why the order matters: with that many symbols on a sheet, a missed type or a double-counted room is easy to make and hard to see later.
1. Gather the documents
Before you count anything, make sure you have everything that affects the lighting scope:
- Every lighting plan, for every floor and building, plus enlarged plans and the site or exterior lighting plan.
- The fixture schedule and the notes under it.
- The symbol legend (switches, sensors, emergency marks, home-run and conductor marks).
- General notes and keyed notes on each sheet. They often add devices or change how something is wired.
- Lighting control details: relay panel diagrams, sensor and power pack details, sequences.
- Panel schedules, for circuit counts and where each home run lands.
- The lighting sections of the specification, for wiring methods, supports, testing and any approved products.
- The architectural reflected ceiling plans, for ceiling types and heights.
- All addenda. Check every sheet is the latest issue before you start.
Make a sheet list with the scale of each sheet. You will need the scale for wiring, and a sheet list is the easiest way to prove later that nothing was skipped.
2. Read the fixture schedule before you count
The schedule is your type list. For each type, note the mark (the tag printed beside the symbol on the plans), the description, the mounting, the voltage and any remark. On the example set, the schedule has the columns Mark, Description, Manufacturers and Catalog #'s, Lamps, Volts, Mounting and Remarks; our run read 44 types from it, from 2' x 4' lay-in troffers to pole lights and exit signs.
Look for the things that change the count or the price: types that differ by length, types that look alike but mount differently, emergency variants, and notes such as "or approved equal". The guide on how to read a lighting fixture schedule goes column by column.
3. Set up the count
Set up one line per fixture type per sheet before you start marking symbols. If the bid has to be broken down by building, floor, phase or alternate, add those breakdowns now. Counting into the right bucket from the start is faster than splitting a total later, and a count per sheet is easy to update when a single sheet is revised.
4. Count the fixtures by type
Work through one sheet at a time, type by type or room by room, and leave a mark on every symbol you count so nothing is counted twice. Then:
- Read the tag on every fixture. The same rectangle can be two types. On the example set, type A is a "2' x 4' LED volumetric lay-in" and type N is a "2' x 4' LED volumetric flanged for drywall": same size, different ceiling, different product and labor.
- Watch for emergency marks. On this set, the symbol key says "Hatching denotes fixture on emergency power." Hatched fixtures carry the same type tag as the rest, so count them by type and again as emergency.
- Check lengths on linear types. This schedule has linear suspended types from 4' to 32' (M, M1, M2, M3, M4), each with its own catalog number.
- Count each area once. Enlarged plans repeat areas of the overall plan, and matchlines split rooms between sheets. The example sheet carries a "Matchline: Unit A / Unit B" note; check what is drawn on each side before counting it.
- Look beyond the floor plans for wall packs, canopy lights and pole lights on site and exterior sheets.
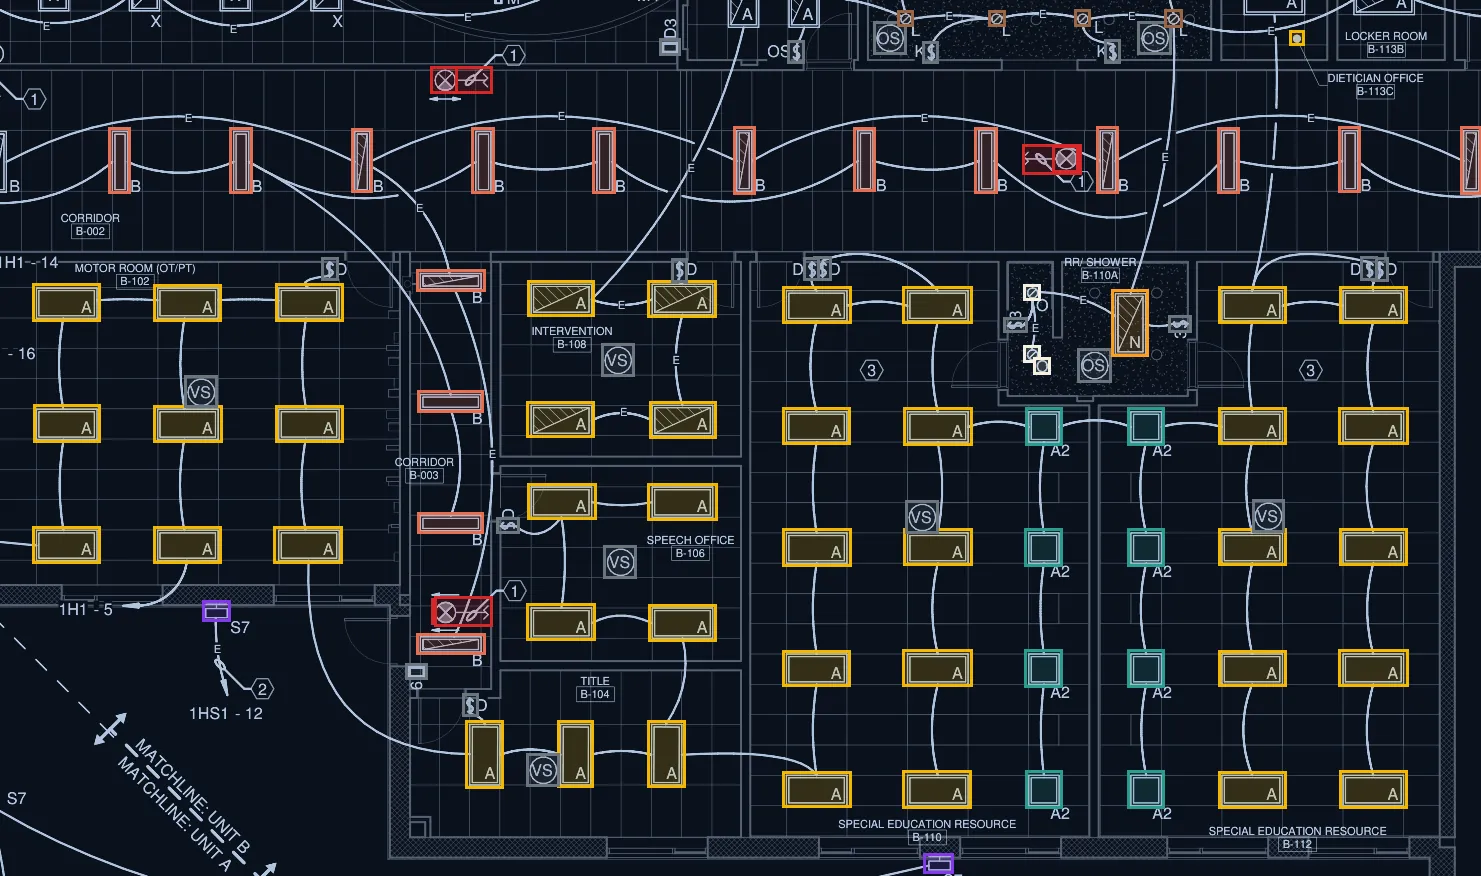
Here are the largest fixture types on the whole sheet from the same run, with the description the schedule gives each type:
| Type | Schedule description | Count |
|---|---|---|
| A | 2' x 4' LED VOLUMETRIC LAY-IN | 72 |
| X | 2' X 2' LED RECESSED FIXTURE | 65 |
| B | 1' x 4' LED FLAT PANEL LAY-IN | 59 |
| L | 4" LED RECESSED DOWN LIGHT | 42 |
| G | 4' LED INDUSTRIAL FIXTURE | 41 |
| H | LED INDUSTRIAL HIGH-BAY FIXTURE | 35 |
| K | 2' x 4' LED FLAT PANEL LAY-IN | 32 |
| Q | 4" LED PENDANT CYLINDER FIXTURE | 19 |
| 17 more | Other fixture types on the sheet | 84 |
5. Exit signs and emergency lighting
Count exit signs as their own item, by type, and read the remarks. On the example schedule, every exit type says "Provide (2) face where shown or required. Wall mount where possible", so faces and mounting come from the plan, sign by sign. Count the emergency fixtures (hatched, in this set) and any battery units, and read the keyed notes for how they are wired. On the example sheet, hex note 1 (a keyed note) says "Connect to respective room emergency lighting circuit ahead of all switching/relays", which is wiring you will price.
6. Lighting controls
Count controls by kind, using the symbol legend: single-pole, three-way, four-way and keyed switches, dimmers, wall and ceiling occupancy or vacancy sensors, low-voltage switches, timers and relay panels. Ceiling sensors often come with a power pack, which is a separate item. On the example set, the legend lists a "0-10V LED slide dimmer with on/off switch", a "dual technology vacancy sensor/wall switch" and ceiling sensors with their power packs. Keyed notes add controls too: hex note 3 on the example sheet asks for dual-level dimming, "one dimmer shall control the row of light fixtures at the teaching wall", the other dimmer the rest of the room.
7. Take off the wiring
Measure branch conduit along the circuits at the sheet's scale, count the home runs by panel, and work out the conductors in each run. In our run of the example sheet, 437 branch runs came to 3,721.9 ft of branch conduit at 1/8" = 1'-0", with 32 home runs to 3 panels. The guide on counting home runs and branch conduit covers the details.
8. Check the count against the schedule
Before the count goes into the estimate, check it both ways:
- Schedule to plans: every schedule type is either counted or confirmed as not on these sheets. A schedule covers the whole job, so some types will be on other floors.
- Plans to schedule: every tag on the plans is in the schedule. A tag that is not in the schedule is a question for the engineer.
- Tags to fixtures: for each type, the tags on the sheet should have counted fixtures beside them. A type with many tags and few counted fixtures is where a miss usually hides.
In the example run, 459 of the 466 type tags on the sheet had a counted fixture beside them, and 15 schedule types were not tagged on this sheet at all, which is normal for a schedule that covers several floors.
9. Price it
With clean quantities, the rest is pricing: material from your price list or vendor quotes, labor from your labor units and rates, wire and conduit from the wiring takeoff, then tax, overhead, contingency and profit. See labor units for lighting fixtures for how to build labor units you can trust.
How InstantTakeoff does it
Upload the drawing set and InstantTakeoff finds the lighting plans, counts light fixtures, exit signs and lighting controls by type from their tags matched to the fixture schedule, and draws every count as a box on the sheet so you can check it. Its review layer flags any type whose tags on the sheet have too few counted fixtures beside them. It traces the branch wiring and home runs, then prices the job from your price list and labor units into a bid summary and a proposal. The example sheet in this guide is a real run of the same quick pass the free tool uses.
Want to see it on your own drawings? Try a sheet free: drop one lighting plan sheet and the counts appear on screen, with no signup and no card. Counts by type, per sheet and for the set, and the priced estimate, in Excel and CSV, through the API, or in your AI assistant. Need them in another tool? Ask us and we'll build the connection, often the same day.
Questions
How long does a lighting takeoff take?
It depends on the number of sheets, how dense they are and how many fixture types the schedule has. One lighting plan sheet of a school in our example holds 450 fixtures, 31 exit signs and 69 controls, so a full set by hand is a long job. Counting by type with a mark on every symbol, then checking against the schedule, is what keeps it accurate.
Should I count by sheet, by floor or by area?
Count the way the bid will be priced and checked. A count per sheet and type is the easiest to check and to update when a sheet is revised. If the owner wants prices by building, floor, phase or alternate, set up those breakdowns before you count, because splitting a single total later takes longer than counting it split.
What gets missed on lighting takeoffs?
Common misses are fixtures drawn on other sheets (site plans, enlarged plans, canopies), emergency variants shown by hatching rather than by their own type, keyed notes that add devices or a second dimmer, power packs for ceiling sensors, and areas drawn twice at a matchline or in an enlargement.
Do I need the reflected ceiling plan for a lighting takeoff?
You count from the electrical lighting plans, but the architectural reflected ceiling plan tells you the ceiling type and height in each room, which drive the fixture frame, supports, lifts and labor. See estimating from a reflected ceiling plan.